Figure 1. The Link/General box. Note the /export:mexFunction directive.
Building MEX files in Microsoft Visual Studio 6
1. Make sure you have /export:mexFunction as one of your Project Options. This is the entry point for the mex file and must be defined for matlab to be able to load the module. Go to the "Link" table in the settings box as shown in Figure 1. You have to type the /export command directly into the Project Options box as shown (highlighted).
2. Include libmx.lib and libmex.lib as additional libraries in the Link/Input.
The directory for these is C:\matlabR12\extern\lib\win32\microsoft\
msvc60, or wherever you have MATLAB installed.
3. In the C/C++/Preprocessor box, add c:\matlabr11\extern\include to the list of additional include directories. This is necessary for mex.h.
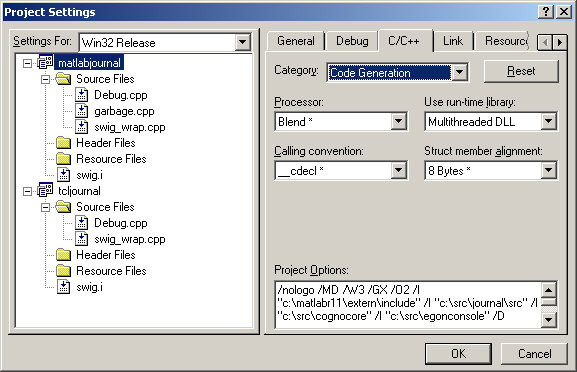
4. Make sure your code generation options in C/C++/Code Generation (see Figure 2) are compatible with everything else you're using. I've had the most success with "Multithreaded DLL", since most of our other code is built this way. If you try to link single-threaded DLL mode code against multi-threaded DLLs or libs, you will get all kinds of crazy errors -- most common is that you will get conflicts/redefinitions of basic C/C++ classes, STL instantiations, etc.
5. That should be it - just Build and go!
Figure 1. The Link/General box. Note the /export:mexFunction directive.